Microsoft 365
Introduction
The new Microsoft 365 data source replaces the old Exchange data source for connections to Microsoft 365 (previously Office 365).
Due to planned service changes in Microsoft 365 the old Exchange data source will no longer be able to connect. For existing customers this change will happen during the second half of 2021 (preliminary).
Setup overview
- Register an app in your Azure AD to enable authentication and access to relevant data
- Install Wayfinder Importer on a suitable computer and connect it to
Smartsign
- Microsoft requires TLS 1.2 communication which is not enabled for .NET applications by default. It must be enabled manually and the computer must be restarted. Instructions: https://docs.microsoft.com/en-us/mem/configmgr/core/plan-design/security/enable-tls-1-2-client
- Create a Microsoft 365 data source and connect it with the application you created
Register an app to access your calendar information
Microsoft 365/Azure AD administrator access required
-
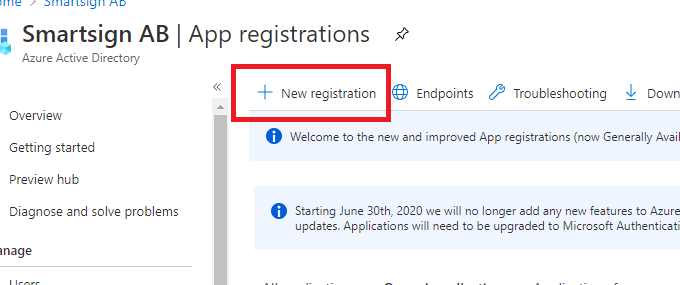
Go to https://aad.portal.azure.com/ and login with an admin user
-
Click Azure Active Directory

-
Click App registrations

-
Click New registration
-
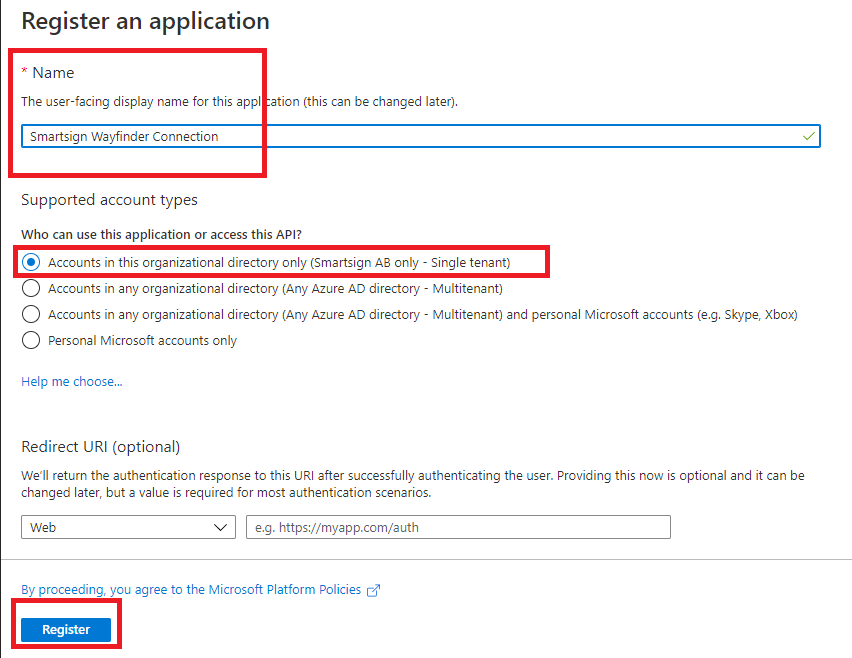
Enter a suitable name for the app. for example "Smartsign Wayfinder Connection" and which accounts should be allowed to access it. Normally accounts in this organizational directory only.
Complete the task by clicking Register.
-
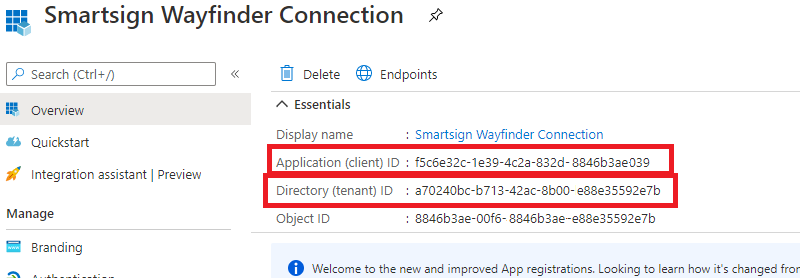
The app will now be created. Please make a note of the Application (client) ID and Directory (tenant) ID. You will need them later.
-
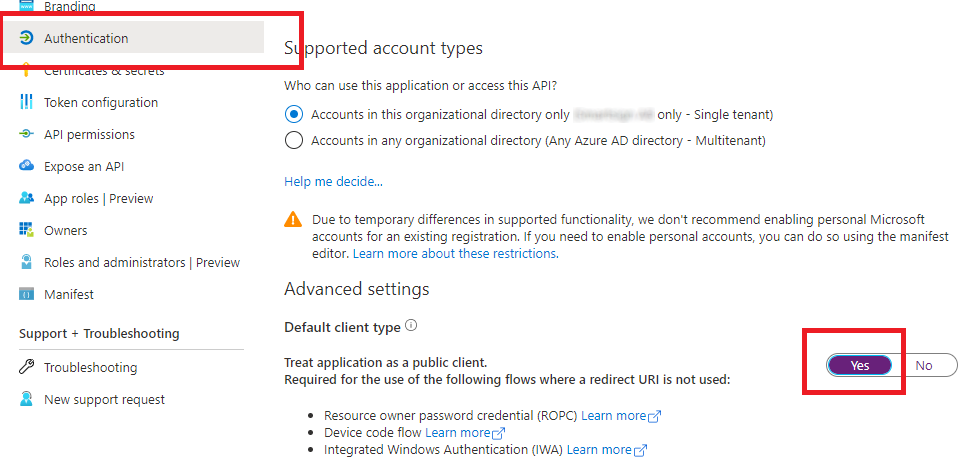
Click Authentication

-
Set the Default client type to Yes, then Save.
-
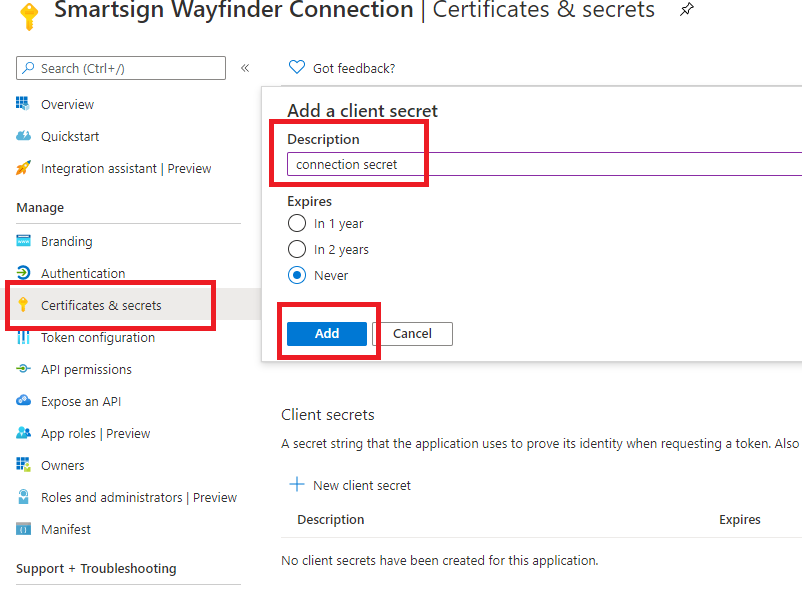
Click Certificates & secrets

-
Click New client secret
-
Give the secret a description and select when it should expire (typically never).
-
The secret will be created and shown below Client secrets.
IMPORTANT! Make a note of the secret right away. You will not be able to access it again.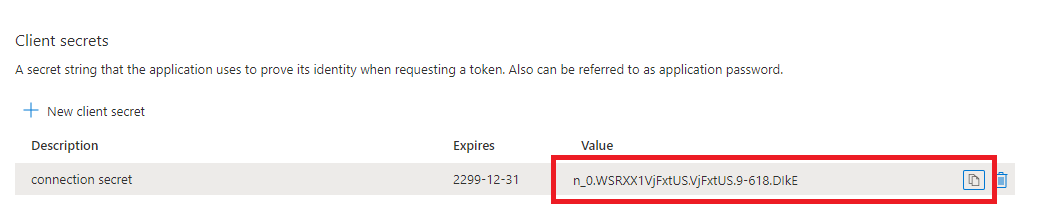
-
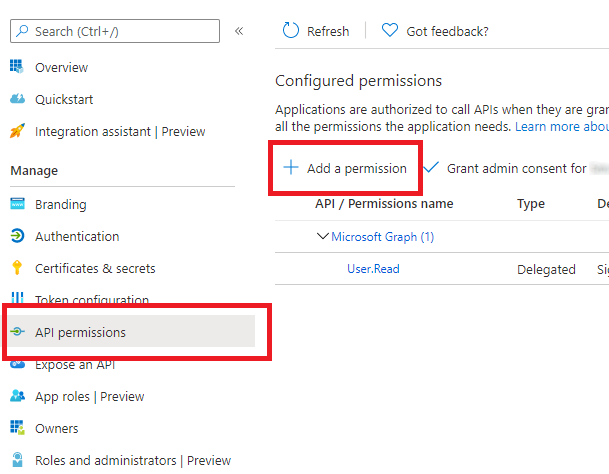
Click API permissions

-
Click Add a permission
-
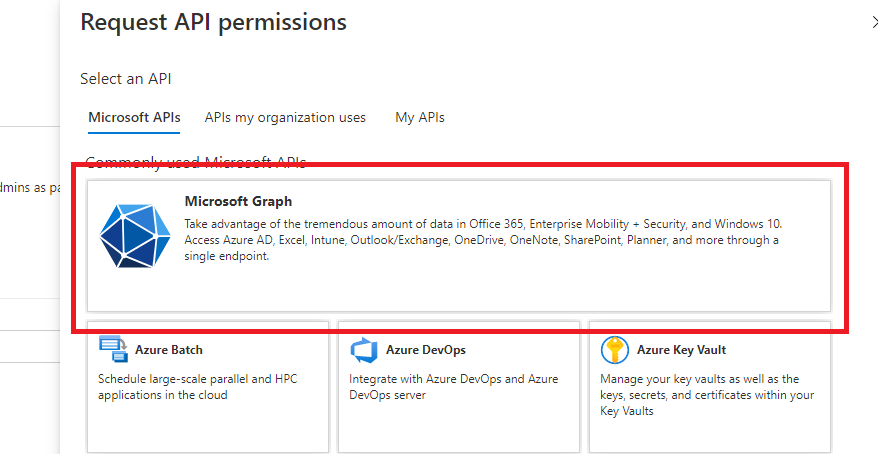
Select Microsoft Graph
-
Select Application permissions
-
You can type in the search field to find permissions. You'll need to add the following permissions.
Permission Used for Calendars.Read Reading the resource calendars Calendars.ReadWrite (optional) Reading the resource calendars and creating/deleting bookings Place.Read.All Finding available resources 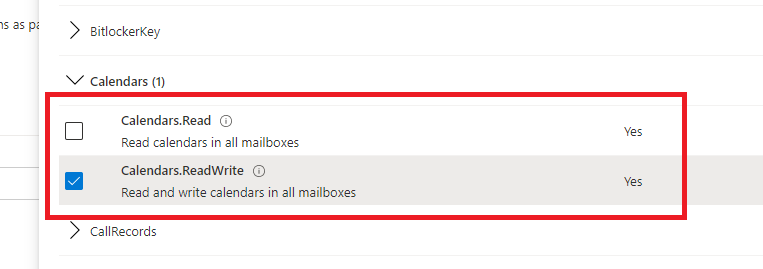

Check each permission and click Add permission to add them.

-
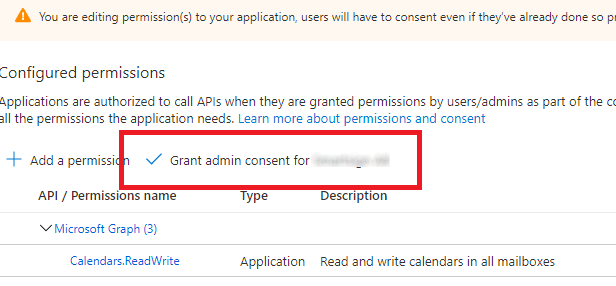
With the permissions added, click Grant admin consent for <your company> and then confirm.
 **
** -
Verify all permissions are green.

-
Done!
Install Wayfinder Importer
The Wayfinder Importer application is the bridge between your Exchange solution and Smartsign. It can be installed on a computer of your choice, but we recommend installing it on a server so that it’s running 24/7.
Please note that the Importer requires .NET 4.8.
- Create an account for the Wayfinder Importer on your Smartsign Server or Cloud Service. User profile should be “Wayfinder” or “Conference”.
- Install the Smartsign Wayfinder Importer to a computer. The computer must be able to access both Microsoft 365 and your Smartsign Server/Cloud service.
- Fill in the server address and the account details of the account you just created.
- It can be a good idea to set the log level to “DEBUG” initially in order to get detailed information when you configure the actual import.
- Save your settings and allow the service to restart when prompted.
- The Wayfinder Importer service should now be connected, and you can proceed with logging on to Smartsign and creating a data source.
Create a Microsoft 365 data source
Login to Smartsign Publisher, go to Management → Content -> Data sources and click on Create New.
Select your Wayfinder Importer service in the list and then click “Next”.
Select the Microsoft365 Calendar Import data source, click “Next” and fill in the necessary settings to synchronize calendars from your Microsoft 365 tenant.
Microsoft 365 Calendar Import - Data Source Settings
|
User |
Select a Smartsign user, we recommend creating a specific one for this purpose |
|
Password |
Password for the Smartsign user above |
|
Tenant ID |
Directory (tenant) ID |
|
App Client ID |
Application (client) ID |
|
App Client Secret |
Client secret |
|
TimeZone |
Your "normal" timezone |
|
SearchRoomsStartingWith |
Search for room calendars starting with this string, performed server-side. If left empty the importer will receive all available room calendars. |
|
Room prefix |
Adds an additional filter after receiving the room calendars. Only rooms beginning with Room Prefix will be processed. Multiple room prefixes can be used by separating them with a comma (,). |
|
Hide private booking names |
True: Hide the booking name on private bookings. |
| Delete unconfirmed bookings | True: Delete unconfirmed bookings from the M365 calendar |
| BookingTimeOffset | Enter a positive or negative number to offset bookings by x hours |
|
BookingNameFilter |
Input a string to only import bookings that contain that specific string. The matching is case sensitive. This allows you to explicitly select which bookings should be imported, by searching the booking names for a specific string. Only bookings that contain the string entered will be imported. In addition, you can also control the booking name shown on screen since only the text after the search string will be included. Make sure to use a string that should not match by accident. For example: @SCREEN If matched, the string itself and any additional content before it, will be removed from the booking name during import. Leave empty to import all bookings (default). |
|
Two-way sync |
True: Import bookings created in Smartsign (calendar and on screen) into Exchange calendar. Calendar items created in Smartsign can only be modified in Smartsign and vice versa. |
|
LookAheadTime |
Example: 2.00:00:00 = 2 days This setting controls how far head bookings will be imported. To reduce unnecessary updates it’s a good idea to keep this value low. The next few days is usually more than enough. |
|
CompareWithArchive |
True: Every export from Exchange is compared to the previous one to determine if there are any changes. If no change is detected, no import will be done. This reduces unnecessary updates. |
|
Match logo |
True: Search the Media library for images files where the filename or tags match the booking name. If found, the first match will be added to the booking in Smartsign allowing for company logos and similar to be shown on screen together with the booking information. |
|
Exact logo-match |
True: Only match logos with names or tags matching exactly. False: Allow partial matches. |
|
CreateRooms |
True: Automatically create Channels for rooms. NOTE: Only rooms that have bookings within the configured LookAheadTime will be created. If you wish to make sure rooms are created we recommend creating a temporary booking across all the desired rooms for this purpose. False: Channels must be created manually. Any bookings on rooms without matching channel names will not be imported. |
|
CombinedRoomNamesSplitFile |
Path to splitfile (only used in special cases) A splitfile can be used to split an incoming booking. It can for example be used for a combined room. A booking on the room ABC can be split automatically so that it’s imported to rooms A, B and C. It can also be used as an alias function on order to import bookings to a channel with a different name then the imported calendar room. |
Troubleshooting
Log files
Except for the configuration interface there is no user interface for the Conference Importer application. It runs in the background as a system service. To see what it is doing and troubleshoot you must check the log files on the computer where it is installed.
- Open up Windows Explorer and browse to C:\Program Files(x86)\Smartsign Wayfinder Importer 10\logs
- Most of the relevant information can be found in the file INPUT_ROLE.LOG
- If there are issues connecting to your Smartsign Server or cloud service, those errors are likely in SERVER.LOG
- To change the detail level of the logs. Start Smartsign Wayfinder Importer Configuration and adjust the Log Level setting. Normal level is INFO, set it to DEBUG for more detailed information.
Booking names
Microsoft 365 resource calendars default to showing the name of the person that created the appointment. This behavior can be changed in Exchange so that it shows the subject of the appointment instead. Please see the following Microsoft support article for information.